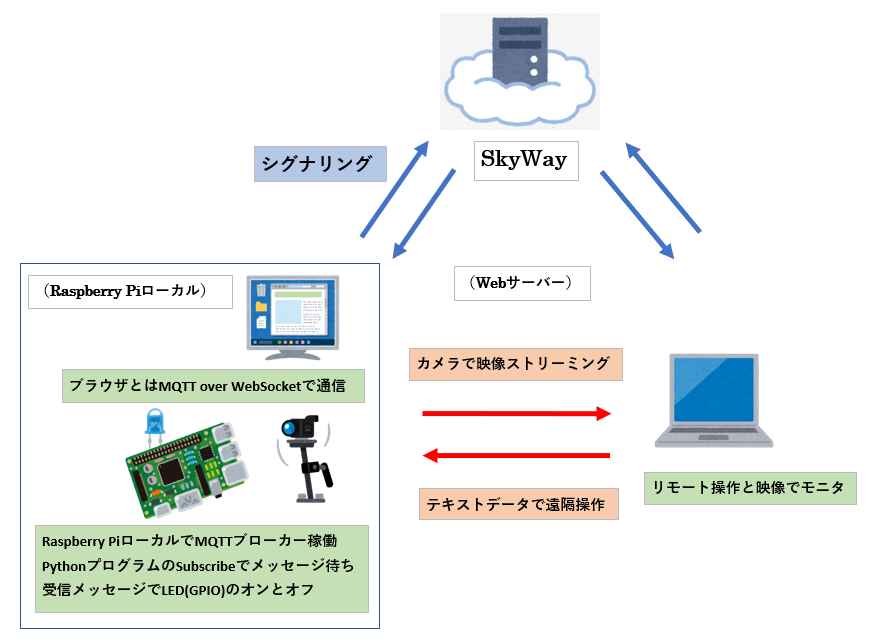
前回の続きです。全体的にはSkyWayを利用してRaspberry Piの遠隔操作をしてみようという内容です。
前回はRaspberry Pi側でのブラウザ(JavaScript)からMQTT over WebSocketを使ってローカルのRaspberry Pi自身のGPIOを操作する(下の図の左下の部分です)という内容を書きました。今回はSkyWayのP2P通信でこのRaspberry Pi側のブラウザを経由してリモート側からGPIOを操作(下の図で真中の赤い部分から右側です)するという内容です。
全体的な遠隔操作の構成

SkyWayとMQTT over WebSocketとの接続
以下の記事ではSkyWayを利用してローカルカメラ側とリモート側に分けて映像ストリーミングと双方向のテキストデータのやり取りが確認出来ました。
SkyWayの利用(その3)JavaScriptでの開発2
また以下でRaspberry Piでの動作も確認出来ています。
SkyWayの利用(その4)Raspberry Piでの利用
このSkyWayでのストリーミングプラステキストデータ送受信に前回のMQTT over WebSocketの処理を追加してリモートから受け取ったテキストメッセージに応じてローカルのGPIOの処理(Lチカ)をやってみようという流れです。
そのMQTT over WebSocketクライアントでSkyWayのデータコネクションで受け取ったテキストデータをRasberry PiローカルのMQTTブローカーに送信して前回のようにGPIOを操作します。
今回のRaspberry Piの構成は以下です。LEDが接続されていて、Webカメラも接続してその映像を確認します。あと前回のMQTTのブローカーとsubscribeのプログラムを確実に起動しておきます。

これに対してリモート側では以下のように表示されます。
「リモートカメラ接続実行」でRaspberry Pi側の映像が確認出来ます。ピントは微妙ですがご了承下さい。

「リモートLED ON」でRaspbery Pi側のLEDがONになります。「リモートLED OFF」でOFFになります。その状態がモニター出来ます。

以下がRaspberry Pi側のページです。SkyWayの映像ストリーミングとデータストリームを実装してデータストリームではMQTT over WebSocketと連携しています。
<html lang=ja>
<head>
<title>SkyWay Start02 ローカルカメラ</title>
<meta charset="UTF-8">
<style></style>
<script src="https://cdn.webrtc.ecl.ntt.com/skyway-latest.js" type="text/javascript"></script>
<script src="https://cdnjs.cloudflare.com/ajax/libs/paho-mqtt/1.0.1/mqttws31.js" type="text/javascript"></script>
<script src="https://code.jquery.com/jquery-1.12.4.js"></script>
<script type="text/javascript">
let localStream = null;
let mqtt = null;
function cameraInit() {
navigator.mediaDevices.getUserMedia({video:{ width: 800, height: 600 }, audio: true})
.then(function (stream) {
// Success
$('#my-video').get(0).srcObject = stream;
$('#my-video').playsInline = true;
localStream = stream;
mqtt = new Paho.MQTT.Client("localhost", 9090, "cli01");
console.log("conncting");
var options = {
timeout: 60,
onSuccess: onConnect,
onFailure: onFailure,
};
mqtt.onMessageArrived = onMessageArrived;
mqtt.connect(options);
var peer = new Peer(
'myCamera01', {
key: 'API-KEY',
debug: 3
});
peer.on('open', function(){
console.log('open');
});
peer.on('connection', function (dataConnection) {
//alert('con');
dataConn = peer.connect(dataConnection.peer);
peer.call(dataConnection.peer, localStream);
dataConn.on('data', function(datamsg){
$('#response').text(datamsg);
message = new Paho.MQTT.Message(datamsg);
message.destinationName = "isyjp/gpio21";
mqtt.send(message);
});
$('#send').click(function () {
var message = $('#message').val();
dataConn.send(message);
});
//alert('coned');
});
}).catch(function (error) {
// Error
console.error('mediaDevice.getUserMedia() error:', error);
return;
});
}
function onConnect()
{
console.log("on Connect");
mqtt.subscribe("isyjp/tp01");
}
function onMessageArrived(msg)
{
console.log("on Arrived");
console.log(msg.payloadString)
//$('#message').text(msg.payloadString);
}
function onFailure()
{
}
</script>
</head>
<body>
<h3>SkyWay ストリーミングとテキストデータ(カメラ側)</h3>
<hr>
<p><button type="button" onclick="cameraInit()">ローカルカメラ接続実行</button></p>
<p><video muted id="my-video" autoplay="1"></video></p>
<p><div id="response">受信データ</div></p>
<p><input type="text" placeholder="メッセージ" id="message"> <button type="button" id="send">送信</button></p>
</body>
</html>
リモート側のページが以下です。
Raspberry Piローカル側と同様に以下の記事で書いたページが元になっています。SkyWayの詳細が必要な場合は以下のページを参照して下さい。
SkyWayの利用(その3)JavaScriptでの開発2
<html lang=ja>
<head>
<title>SkyWay Start02 リモートカメラへ接続</title>
<meta charset="UTF-8">
<style></style>
<script src="https://cdn.webrtc.ecl.ntt.com/skyway-latest.js" type="text/javascript"></script>
<script src="https://code.jquery.com/jquery-1.12.4.js"></script>
<script type="text/javascript">
function cameraConnect() {
var peer = new Peer(
'myView01', {
key: 'API-KEY',
debug: 3
});
var dataConn;
peer.on('open', function() {
peer.connect("myCamera01");
});
peer.on('connection', function (connection) {
dataConn = connection;
dataConn.on("data", onRecvMessage);
$("#send").click(function () {
var message = $("#message").val();
dataConn.send(message);
});
$("#ledon").click(function () {
dataConn.send("on");
});
$("#ledoff").click(function () {
dataConn.send("off");
});
});
peer.on('call', function(call){
console.log('call');
//alert('call');
call.answer();
setupCallEventHandlers(call);
});
}
function setupCallEventHandlers(call){
call.on('stream', function (stream) {
//alert('stream');
var video = $('#remote-video').get(0);
video.srcObject = stream;
$("#mutedoff").click(function () {
video.muted = false;
});
});
$("#conclose").click(function () {
call.close();
});
}
function onRecvMessage(data) {
$("#response").text(data);
}
</script>
</head>
<body>
<h3>SkyWay ストリーミングとテキストデータ(リモート側)</h3>
<hr>
<p><button type="button" onclick="cameraConnect()">リモートカメラ接続実行</button></p>
<p><video muted id="remote-video" autoplay="1"></video></p>
<p><button id="mutedoff">音声オン</button></p>
<p><button id="conclose">切断</button></p>
<p><div id="response">受信テキスト</div></p>
<p><input type="text" placeholder="メッセージ" id="message"> <button type="button" id="send">送信</button></p>
<p><button type="button" id="ledon">リモート LED ON</button></p>
<p><button type="button" id="ledoff">リモート LED OFF</button></p>
</body>
</html>
元のページに「リモート LED ON」というボタンと「リモート LED OFF」というボタンを追加しました。このボタンでSkyWayのデータコネクションで”on”という文字列と”off”という文字列を送信します。テキストから”on”、”off”を手入力して「送信」ボタンで送信するのと同じことです。
以上でSkyWayを利用したRaspberry Piの遠隔操作が動作確認出来ました。始めにも書きましたが、SkyWayのP2Pなので直接的なリモート操作が実感出来ると思います。またデータストリームでのテキストに応じた操作なのでいろいろと応用が出来ると思います。
今回はここまでです。また書きたいと思います。
