Core BluetoothでBLE通信(Bluetooth Low Energy通信)の3回目です。前回はペリフェラルを実装してみました。今回は前回のペリフェラルと通信をするためのセントラルを実装してみます。今回はまずはいわゆるHello World的なプログラムのレベルです。ペリフェラルからのNotifyを受信するのみの機能です。試してみたところ前回のペリフェラルと両方を1台のiOSで動作させることは出来ませんでした。このあたりはご了承ください。
Core Bluetoothの仕様詳細等は以下のマニュアル等を参照して下さい。
Core Bluetooth プログラミングガイド
ソース一式は以下からダウンロード出来ます。(※テスト的なプログラムです。一切無保証ということをご了承下さい。)
ソース一式
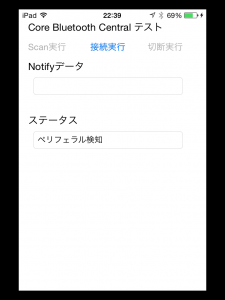
今回のアプリの画面は以下です。iPad miniを使っています。
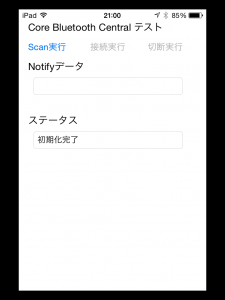
画面と合わせてプログラムを順番に書いていきます。
ViewControllerのヘッダファイルです。
#import <UIKit/UIKit.h>
#import <CoreBluetooth/CoreBluetooth.h>

@interface ViewController : UIViewController<CBCentralManagerDelegate,CBPeripheralDelegate>
{
    //セントラル
    CBCentralManager *centralManager;

    //ペリフェラル
    CBPeripheral *targetPeripheral;

    //ターゲットペリフェラル
    NSString* UUIDService;
    NSString* UUIDCharacteristics;
}

//画面関連
@property (weak, nonatomic) IBOutlet UIButton *btnScan;

@property (weak, nonatomic) IBOutlet UIButton *btnConnect;

@property (weak, nonatomic) IBOutlet UIButton *btnClose;

@property (weak, nonatomic) IBOutlet UITextField *txtNotifyData;

@property (weak, nonatomic) IBOutlet UITextField *txtStatus;

- (IBAction)OnBtnScan:(id)sender;

- (IBAction)OnBtnClose:(id)sender;

- (IBAction)OnBtnConnect:(id)sender;

@end
上記画像の初期化完了までの処理です。
まずは初期化です。CBCentralManagerの初期化ですが、バックグラウンドキューにはnilを指定しています。これでmainキューを使うことになります。ここではBLE通信を確認することが目的ということでmainキューを使うことにしました。uuidの文字列は前回のペリフェラルで実装したサービスとキャラクタリスティスクの文字列です。
- (void)viewDidLoad {
    [super viewDidLoad];

    //Centralの初期処理
    centralManager = [[CBCentralManager alloc] initWithDelegate:self queue:nil];
    [centralManager setDelegate:self];

    //画面の初期化
    btnScan.enabled = false;
    btnConnect.enabled = false;
    btnClose.enabled = false;

    txtStatus.text = @"";
    txtNotifyData.text = @"";

    //ペリフェラルUUIDの設定
    UUIDService = @"C52D11BC-C2EE-422D-955A-D834930CF567";
    UUIDCharacteristics = @"F13167B2-1FAE-4E7D-9200-B2DFA35510F8";
}
次にステート変更時の処理です。実際にはいろいろと考慮することがあると思いますが、有効になったらscanボタンを使えるようにします。このステート変更後(CBCentralManagerStatePoweredOn)に実際のセントラルの処理が可能になります。
- (void)centralManagerDidUpdateState:(CBCentralManager *)central{
    if(central.state == CBCentralManagerStatePoweredOn) {
        //scanボタンを有効にする
        btnScan.enabled = true;
        txtStatus.text = @"初期化完了";
    }
}
ここで、ペリフェラルでアドバータイズを実行します。(※プログラムは前回を参照して下さい。)
セントラルでScan実行を開始します。以下のように検知出来ると思います。
Scan実行ボタンでScan開始
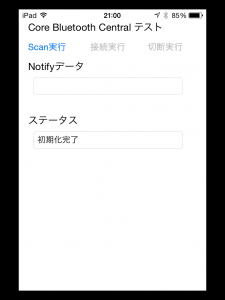
Scan処理のセントラルのプログラムは以下です。
Scan実行時の処理です。サービスを指定してスキャンを開始しています。
- (IBAction)OnBtnScan:(id)sender {

    btnScan.enabled = false;
    txtStatus.text = @"スキャン中";

    CBUUID *uuid = [CBUUID UUIDWithString:UUIDService];
    NSArray *services = [NSArray arrayWithObjects:uuid,nil];

    [centralManager scanForPeripheralsWithServices:services
        options:@{ CBCentralManagerScanOptionAllowDuplicatesKey : [NSNumber numberWithBool:YES]}];
}
スキャン完了時の処理です。ペリフェラルを保持して、GUIを更新します。これで接続実行ボタンが有効になります。
- (void) centralManager:(CBCentralManager *)central didDiscoverPeripheral:(CBPeripheral *)aPeripheral advertisementData:(NSDictionary *)advertisementData RSSI:(NSNumber *)RSSI {
    //スキャンの終了
    [centralManager stopScan];

    //ペリフェラルを保持する(ここではペリフェラルは単独)
    targetPeripheral = aPeripheral;
    targetPeripheral.delegate = self;

    btnConnect.enabled = true;
    txtStatus.text = @"ペリフェラル検知";
}
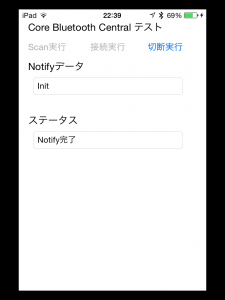
接続を実行します。問題がなければ以下の画像のようになります。
接続処理と接続完了後の処理です。まず接続処理です。
- (IBAction)OnBtnConnect:(id)sender {
    btnConnect.enabled = false;
    txtStatus.text = @"サービススキャン中";

    [centralManager connectPeripheral:targetPeripheral options:nil];
}
接続完了後の処理です。ここではとりあえず全てのサービスを検索しています。
- (void)centralManager:(CBCentralManager *)central didConnectPeripheral:(CBPeripheral *)peripheral
{
  //サービスを探す
  [peripheral discoverServices:nil];
}
サービス検知時の処理です。ここではキャラクタリスティスクを指定して検索しています。
- (void) peripheral:(CBPeripheral *)aPeripheral didDiscoverServices:(NSError *)error {

    for (CBService *aService in aPeripheral.services){
        if ([aService.UUID isEqual:[CBUUID UUIDWithString:UUIDService]]) {
            [aPeripheral discoverCharacteristics:@[[CBUUID UUIDWithString:UUIDCharacteristics]]
                                      forService:aService];
        }
    }
}
キャラクタリスティスク検知時の処理です。
- (void)peripheral:(CBPeripheral *)peripheral didDiscoverCharacteristicsForService:(CBService *)service
                    error:(NSError *)error
{
    /// Characteristic に対して Notify を受け取れるようにする
    for (CBService *service in peripheral.services) {
        for (CBCharacteristic *characteristic in service.characteristics) {
            [peripheral setNotifyValue:YES forCharacteristic:characteristic];
        }
    }

    txtStatus.text = @"Notify受付中";
    btnClose.enabled = true;
}
Notifyを受け取る処理です。初回はすぐにNotifyが返ってきます。
- (void)peripheral:(CBPeripheral *)peripheral
didUpdateValueForCharacteristic:(CBCharacteristic *)characteristic
             error:(NSError *)error
{
    txtStatus.text = @"Notify完了";

    NSString *stringFromData =
        [[NSString alloc] initWithData:characteristic.value encoding:NSUTF8StringEncoding];

    txtNotifyData.text = stringFromData;
}
ここでペリフェラルからNotifyを実行してみます。そうするとセントラルで更新されます。
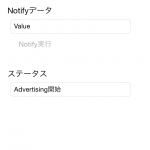
以下はペリフェラルの画面です。Notifyを実行ボタンでNotifyが実行されます。
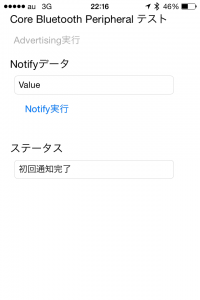
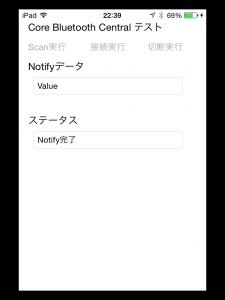
こちらがセントラルの画面です。上のペリフェラルのValueという文字列を受け取っています。
最後にペリフェラルとの接続の切断処理です。
- (IBAction)OnBtnClose:(id)sender {
    [centralManager cancelPeripheralConnection:targetPeripheral];
    btnClose.enabled = false;
}
これで一通りの処理が完了です。再度実行する場合は強制終了して起動します。
今回はNotifyだけですが、BLEの通信の確認が出来ました。次の段階としては、Read、Writeの処理もありますし、別のプラットフォーム(Android、Windows等)でのBLEでの通信プログラムということもあると思います。今回のシリーズとしてはここまでですが、また出来たら公開したいと思います。
